
Configuration and Options
The features available depend on your Altium product access level. If you don’t see a discussed feature in your software, contact Altium Sales to find out more.
The BOM Portal interface provides options and features that allow you to set up the system to match your specific needs for the current Managed BOM. These include configuring the sourced supplier data to your company's requirements, and working with the BOM listing in a manner that suits your processes.
BOM Settings Copy Link Copied
The BOM Settings window, opened from the BOM Settings option in the main ![]() menu, allows you to configure which parts Suppliers and Library Component parameters are enabled for the current Managed BOM, change how Issues are reported, and also specify the production run, preferred packaging type, the currency and global region used for cost estimates, and proposed BOM completion date.
menu, allows you to configure which parts Suppliers and Library Component parameters are enabled for the current Managed BOM, change how Issues are reported, and also specify the production run, preferred packaging type, the currency and global region used for cost estimates, and proposed BOM completion date.

Target Price
Target Price parametric data allows the addition of a desired maximum unit price figure to each part item in an ActiveBOM document or a Workspace Managed BOM. This feature assists the overall supply chain risk assessment by raising a Target price missed Issue if the item’s supplier Unit Price is greater than the Target Price. 
The Target Price dataset is available in a Managed BOM if it was included in the BOM’s source, such as the Project (with ActiveBOM) it was created from or the BOM data file that was uploaded. If not available, a Target Price column can be added manually and the parameters remapped, however, this process is automated when the Target Price option is enabled as described below.

When the BOM Settings Target Price option is enabled:
-
The Managed BOM’s Set Target Price to Actual Price command is available and can be applied to individual or all BOM Item entries. This command propagates an item’s current supplier
Unit Priceto the item'sTarget Priceentry, which in turn means that a Target price missed warning will be generated if a subsequent supplier solution represents a higher price. -
If not already visible in the Managed BOM, the Target Price column data is exposed.
-
If the Managed BOM does not include
Target Priceparametric data, it is automatically created as blank entries of the correct data type (Money) and its column data is exposed in the BOM view.
When the BOM Settings Target Price option is disabled, the Set Target Price to Actual Price command options are no longer available and the Target Price column is hidden.
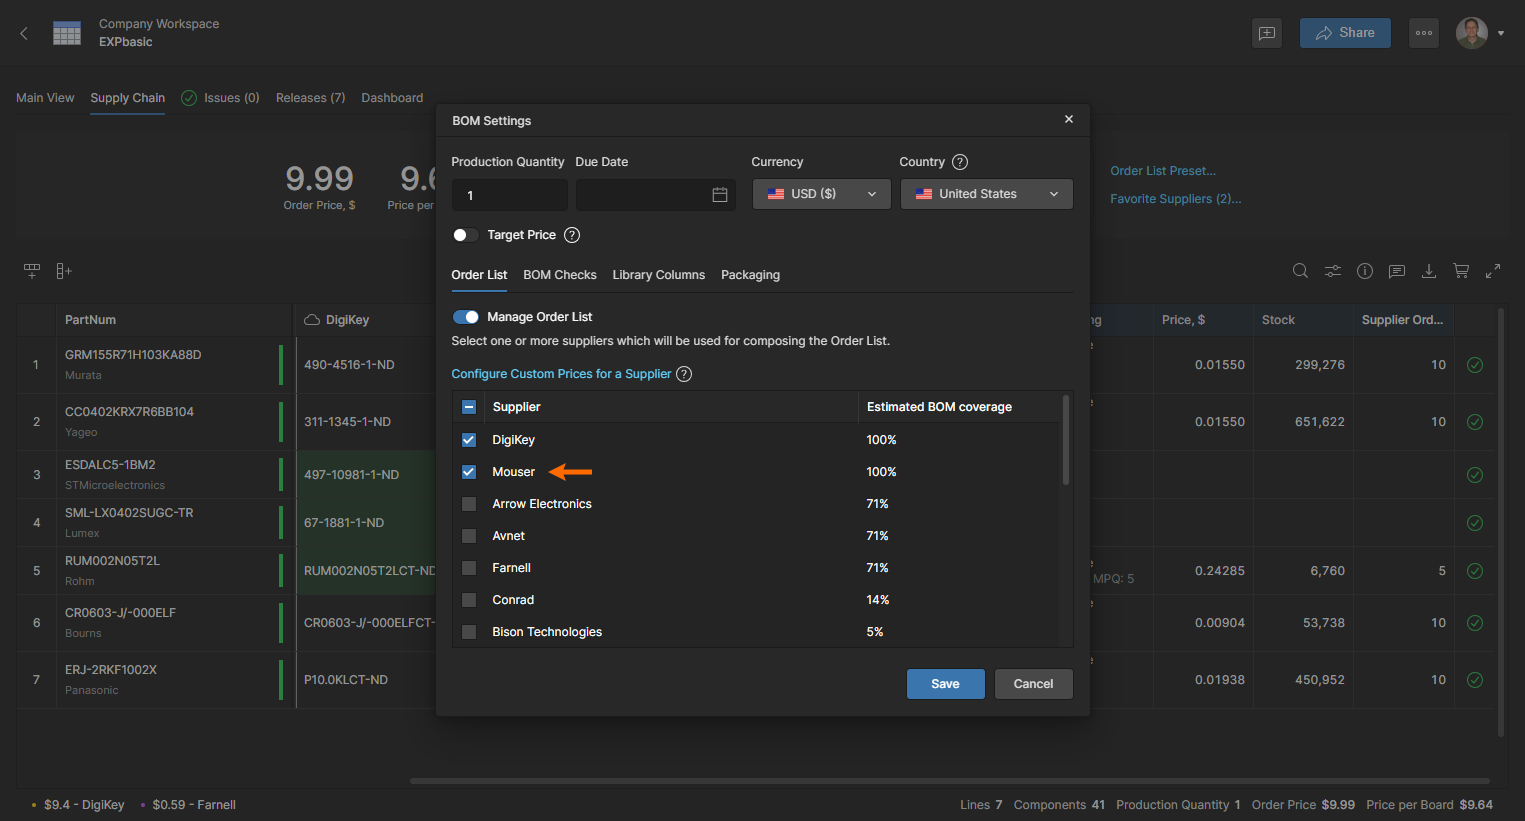
Order List
Select the Order List tab in BOM Settings window to enable/disable parts Suppliers, whose availability is determined by the Part Source settings in the Workspace Admin – Part Providers page. The BOM Settings window is also available from the Favorite Suppliers link in the Supply Chain view.
|
Optimize the purchasing solutions achieved for your BOM parts list by changing the supplier options in the BOM Settings window.
Enable/disable Supplier data sources that will be used for purchasing solutions based on parts suitability and pricing – the default selections are those checked in the BOM Portal App configuration. Deselect the Manage Order List option to exclude Supply Chain purchasing solutions from the BOM line items. When selecting suppliers in the list, note their estimated compatibility (%) with BOM items shown in the BOM Coverage column. Also note that Suppliers not enabled in the Altium Parts Provider are not included in this list. The presented Supply Chain parts solutions (highlighted in green) will automatically change in response to updated Supplier preferences. The parts solutions derived from the available Supplier data will take into account your production run (Production Quantity), since the number of parts to be purchased will directly impact pricing. A changed production quantity (number of board assemblies) will invoke a different set of purchase solutions due to the effect of MOQ (Minimum Order Quantities) and price-break points. After specifying a larger production run the updated part solutions represent a much lower cost, as also reflected in the main pricing summary present above the BOM item list (see Price per Board). |


Custom Pricing
If your company has a special account pricing arrangement with a supplier, the BOM Portal can accommodate this through the Configure Custom Prices for a Supplier option in the BOM Settings window (access requires administrator privileges). When configured, the supplier’s pricing data used in a Managed BOM will reflect the pricing arrangement associated with your company’s supplier account.
|
Select the Configure Custom Prices for a Supplier option to register a supplier account with the BOM Portal. Note that the supplier must be enabled in both the Workspace Altium Parts Provider and the BOM Settings to make the supplier’s data available to your Managed BOMs The Custom Supplier Configuration is set up in the Workspace Admin - Part Providers area since it is part of the existing Altium Parts Provider entry. Select a supplier from the Supplier drop-down menu and enter your account credentials (ID, key or password as required). Test the supplier account connection ( |


BOM Checks
Select the BOM Checks tab in BOM Settings window to view and customize how BOM line Issues are reported in the current document. Each type of BOM validity check can be changed to report at any of the available levels – including the option to ignore a check (No Report). An updated reporting level and its associated icon will then show in the BOM document when the matching issue is encountered.
|
Issues with Managed BOM line items are flagged in the right-most column by icons that correspond to a The current issues can be selectively viewed under the Issues tab for confirmation or correction. See BOM Error Detection and Correction for information on this view. The reported level of each issue type is viewed and customized through the BOM Settings option, which opens the BOM Settings window. Access the BOM check reporting settings under the BOM Checks tab. In the example shown here, the Duplicate Designator and Out of Date issues are currently reported as an Use the Report Level drop-down options to change the type of reported issue as required. Note that the default setting is indicated, and the After confirmation with the In this example the changed reporting levels cause the Duplicate Designator problem to be flagged as a |


Library Columns
Select the Library Columns tab in the BOM Settings window to add any of the available Component Library parameters to the Managed BOM as data columns. The BOM Settings window is also available from the Manage Library Columns link in the Column display preferences menu (![]() ).
).
This list is populated with all available parameters in the Component Library and allows the inclusion of specific or custom component parameter data columns as needed in your BOM. Once those Library parameters have been enabled, the visibility of their related BOM columns can be controlled from the Column display preferences menu.
|
Open the BOM Settings window from the Select the Library Columns tab and check the component parameters you wish to enable as Managed BOM data columns. Parameters that have valid data in the BOM components are indicated ( The newly enabled library parameters will be included in the Managed BOM as data columns. If needed, relocate a column by dragging its header to a new position. In the same way as other columns, manage the visibility of added columns from the Column display preferences menu ( |


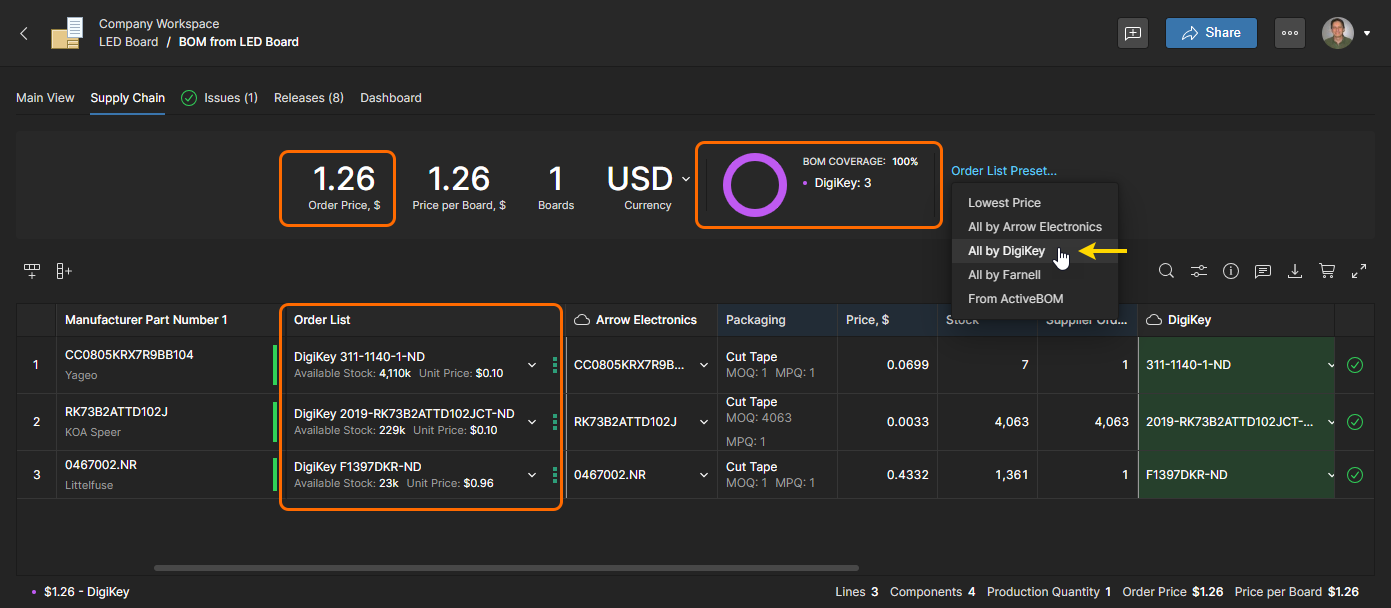
Use the Apply Order List Preset menu in the Supply Chain view to change the criteria that determine which supplier parts will be used for the supplier Order List.
|
By default, the supplier Order List is populated by the lowest cost options available from the enabled Suppliers, but within the constraints of part supply factors such as stock levels and minimum order quantities. Note that the list entries can be overridden by manually selecting a different supplier solution. Select one of the enabled Suppliers from the Apply Order List Preset menu to limit the Order List entries to purchasing solutions from that supplier only. The Order List is repopulated accordingly. The From ActiveBOM option, available when the BOM has been created from a Workspace Project, adopts the The Lowest Price option will update the Order List with the best cost solutions from all enabled Suppliers – this is the default setting. Supplier part options with a lower price but unsuitable stock levels or minimum order quality ( |


Packaging
Select the Packaging tab in the BOM Settings window to specify the preferred and allowable component packaging types used in the BOM Portal’s automated Order List. The settings will affect the list’s generated supplier solutions, and can be adjusted to suit company component packaging requirements such as manufacturing processes and storage preferences.
When the packaging type priority option is enabled, the window is populated with a Configure Packaging Priority list of all available types. The list entries can be disabled/enabled and manually reordered to determine their descending priority.
|
The Order List’s automated part packaging selections, as shown in the Packaging column, can be varied from the Packaging tab of BOM Settings window. Enable the packaging type option to set the automated packaging selection priority to the order shown in the Configure Packaging Priority list. The BOM listing's Order List type selections, as shown in the Packaging column, are altered to comply with the updated packaging type priority – in this example, the highest is The Configure Packaging Priority list can be altered to a new sort order by using the arrow icons to shift the selected type to a new list location. When the window settings are saved ( The Packaging column list reflects the updated Order List selections, which aims to satisfy the current package type priority wherever possible (in this case, Package type entries in the settings Configure Packaging Priority list can be deselected to remove them as a priority. The removed package selections will not be used by the Order List process unless a purchasing solution cannot be found with an enabled packaging type, as is the case for two parts in this example. |


List View Features Copy Link Copied
Additional options are provided for working with the BOM listing and its included line items:
-
 Search: Locate and highlight BOM data text that matches the entered search string (case insensitive).

-
 Column Preferences: Enable/disable the display of parameter columns. Drag and drop entries to re-order the displayed columns – note that a pinned column cannot be moved in the order. The menu’s Manage Library Columns link opens the Library Columns tab in the BOM Settings window, where you can manage the availability of BOM parameter columns.
Info Pane
-
 Information (Info) pane: View full details of the currently selected BOM or advanced search Item based on three tabbed views.
-
Library data tab – available when the part is linked to a Workspace Library component. Shows the component's information such as the library ID Reference, parameters, Part Choices and Where Used information.
-
Global data tab – includes a summary of the part information and stock/pricing, its parameters, and downloadable datasheets (References).
-
Alternates tab – a confidence-rated list of all available part alternatives for the selected BOM line. The tab's included data tiles are grouped as:
-
• Manually Added alternates - existing alternates specifically added using the Add Alternate option or those sourced from an imported BOM (indicated in the pane by Alternate tags;
 ). An Alternate part also can be added to the current BOM line by selecting Add as Alternate from an available entry in the pane’s Alternates tab listing – available entries are those in both the Part Choices for Primary and Suggested Alternates for Primary groups.
-
• Part Choices for Primary - available when a Library component (including its Part Choices list) is associated with the BOM line. The Part Choice that is applied to the BOM line (as
ManufacturerandManufacturer Part Numberentries) is indicated in the pane by a Primary tag ( ).
).
-
• Suggested Alternates for Primary - alternative parts listing provided by the Workspace's parts data resources (IHS Markit, SiliconExpert, etc).
The Alternates tab provides additional options for managing Alternate part entries in the Managed BOM, such as removing an applied Alternate entry (
) from the currently selected BOM item and promoting an applied Alternate entry to be the Primary BOM part () – the previous Primary part is demoted to be an Alternate entry.  Also, an Alternate part in the Suggested Alternates for Primary list can be added as one of the Primary component’s Part Choices using its entry’s Add to Part Choices option.
-
-
The Info pane provides full details on a component item selected in the BOM list or within the Parametric Search results. |


The Info pane also offers a parametric comparison mode that is invoked when two search results entries are selected – use Crtl+Click to choose the additional entry. Parameter differences between the parts are highlighted in red, with data in common and respective Reference information (such as datasheets) shown below.
 Select two component search results entries to view their parametric differences in the Info pane.
-
 Comments: Like other Workspace data viewers, the BOM Portal interface supports document Commenting. BOM comment notes are added to line entries from the Comments and Tasks pane, can be associated with a mentioned user, and assigned to a user as a Task. Open the Comments and Tasks pane and follow the prompts to place a Comment.
|
Open or close the Comments and Tasks pane using the Select the Place a Comment button to add a comment note to a BOM line. Use the resulting placement cursor ( Enter your comment text in the Commenting window along with an optional user mention. Type the @ character to access a list of Workspace members and groups to choose from for mention references. Check the Assign a task option to create a Task (job request) for the mentioned user or a different user selected from the associated dropdown list. Click the Post button to confirm the Comment placement, and if assigned, the creation of an associated Task. The Comment entry is added to the Comments and Tasks pane. The Commenting window, which can be opened at any time, allows users to add subsequent comments, mentions and assignments, or progress the Task status. BOM lines with added Comments are marked with an icon at the beginning of the line. You can select a comment’s Task reference to cross-probe to this entry in the Workspace Tasks view. The Tasks view interface provides details of the current Task, and allows you to progress its Status, change the Priority, assign it to another user, and add further comments or references. |


See Web Viewer Commenting for more information on working with Comments.
See Working With Tasks for more information on Comment-related Tasks.
-
 Download: Save the complete BOM listing with or without a BOM Template, or save a sub-set of the listing based on a specific Supplier in your purchasing Order List. Files are saved to the browser's default location in CSV format (
*.csv), or when a Template is selected, in Excel (*.xlsx) format.

These files are the work-in-progress BOM listings, whereas the BOM can be formally released as a new revision through the BOM Portal's Releases feature and then downloaded from there.
-
 Octocart: Opens the Buy with Octocart pane, which applies the current BOM Order List to generate virtual shopping carts for the individual parts suppliers. The supplier purchasing entries harness Octopart’s component data resources to automatically load the supplier’s web-based shopping cart when the
  (or
(or  ) button is selected. Note that the BOM's Total column data summarizes the part’s order in terms of total cost and Order Quantity, where the latter is the sum of the required Quantity and any Surplus.

-
 Full Screen: Display the interface UI using the browser full-screen mode.
BOM Data Order and Filtering
You can reorder the BOM line items by a specific parameter column using its ascending/descending header options, and also apply column data filtering to restrict line items by specified value entries:
Order BOM line items by a specific set of data by toggling the arrow option in the header of that data column. Click a column header’s ![]() icon to reorder the BOM listing in ascending order by that dataset, click again for the descending data order, and click once more to remove the BOM order defined by that column data.
icon to reorder the BOM listing in ascending order by that dataset, click again for the descending data order, and click once more to remove the BOM order defined by that column data.


Use a column’s filter option (![]() ) to constrain the visible BOM line items to those that match the drop-down menu’s checked items or numeric span. This is particularly useful for isolating BOM line items that include parts with problematic Manufacturer Lifecycles (such as
) to constrain the visible BOM line items to those that match the drop-down menu’s checked items or numeric span. This is particularly useful for isolating BOM line items that include parts with problematic Manufacturer Lifecycles (such as Not for New Designs or Obsolete) or inadequate RoHS/REACH Compliance (such as No or Blanks). Note that the All option toggles all checkboxes on/off.

A number of columns that include composite data, such as Manufacturer Part Number, Order List, and Total allow the selection of their sub-parameters for applying a filter. Manufacturer Part Number for example provides the sub-filter choices of Part Number, Manufacturer and Lifecycle, all of which are included in the column data cells.

List Structure Features Copy Link Copied
The BOM item grid itself can be manipulated using the additional options available at the upper-left of the listing:
-
 Add Row: Add another line item row to the end of the BOM listing, which allows you to manually include another BOM part item entry. Enter (or search for and select) a new part reference in the
 Manufacturer Part Numbercell, and then populate theCountandDesignatorcells to complete the process. When updating a cell value, pressEnterto confirm the change. -
 Add Column: Add a parameter data column into the existing BOM list, which allows predetermined types of data to be included with each line item (
 ). Use the Column Preferences option to change its order position.
-
 Delete Row: Completely remove the currently selected line item row.
-
 Delete Column: Completely remove a column. Column deletion is available when its header is selected, and only for a dataset that is not mapped as a BOM parameter -- such as a column you have manually added, for example.
-
 Hide Column: Remove a parameter column from the displayed BOM list – available when a column header is selected. Equivalent to disabling a column entry in the Column Preferences menu.
-
 Rename Column: Change the
 Titleof a column in the Update Column window – available when a column header is selected. -
 Update to Latest Revision: Refresh a BOM data entry to update a Workspace component part reference that is flagged as Out of Date. You can update all BOM components marked as Out of Date with the Update Component Revisions command.
-
 Unlink From Component: Disconnect the link between the selected BOM line manufacturer part and a Workspace component that has a matching Part Choice entry – available when a BOM to Workspace library link has been established.
-
 Add Alternate: Adds a blank item row below the currently selected row. Enter a suitable
 Manufacturer Part Numberor choose from the drop-down options to complete the alternative component item entry. Note that an alternate also can be manually added by selecting a part entry in the Info pane’s Alternates tab view, or alternates added to all BOM parts automatically using the Autofill Alternates feature. -
 Create Library Component: Creates a component entry based on parameters from the currently selected BOM item line. Once the process is confirmed in the Create Library Component window, the new Workspace library component is created and also linked to the current BOM line entry. Available when the BOM component complies with the requirements but is not yet linked to a Workspace component.
A number of the above options are also available from the right-click context menu, which includes the following additional options:
-

 Copy and Paste: Standard copy/paste operations that act on the currently selected text/area (including column data when its header is selected).
-
 Disable/Enable Checks for This Row: Prevent this row’s component part data from being included in the BOM health check process, as reported by the Issue view and related icons (for example;
  ). A part that has been excluded from the checks will present the ignored icon (
 ) and not be included in the Issues listing, regardless of any potential problems.
-
 Set Target Price to Actual Price: Force the
 Target Priceparameter entry in a BOM item row to adopt theUnit Priceof the current supplier solution, as defined by the Order List entry. This change can be invoked for all BOM item entries with the Set Price to Actual Price command available from the upper menu. Note that both commands are available only when the Target Price option is enabled in BOM Settings.
-
Show/Hide Info: Toggle the Information pane view of data that applies to the currently selected row (line item). Equivalent to toggling the pane with the main icon, as detailed above.
-
 Pin/Unpin Column: Toggle the pinning of a column in the listing view – available when a column header is selected. A pinned column is moved to the left, and will then remain there as the view is horizontally scrolled.
Autofill Alternates Copy Link Copied
The BOM Portal caters for the concept of alternative part options (Alternates) that are associated with a particular BOM line entry. Alternate parts may have been included in an uploaded BOM file, or can be specifically added to a BOM entry with the Add Alternate or Add as Alternate features. In terms of part options, the BOM Portal also offers Library component Part Choices and Suggested Alternates (drawn from its connected data sources) that can be selected through the BOM part search features ( ). Note that Part Choices are available when a BOM entry is linked to a Workspace component.
All of these component part alternatives are brought together for viewing under the Alternates tab in the Info pane as Manually Added, Part Choice List for Primary (if available) and Suggested Alternates for Primary sections. To automatically populate the BOM document with alternate parts drawn from these resources select the Autofill Alternates option from the main ![]() dropdown menu, and then in the Autofill Alternates window, enter the number of alternates you wish to add to each BOM entry and if the additions are restricted to Part Choices only.
dropdown menu, and then in the Autofill Alternates window, enter the number of alternates you wish to add to each BOM entry and if the additions are restricted to Part Choices only.
|
The BOM Portal allows you to add alternate parts to all entries in a single automated step with the Autofill Alternates option. In this example, BOM line 3 already has an alternative component part entry (an Alternate), which may have been manually added or included in an uploaded BOM file. Open the Autofill Alternates window from the main menu ( If the Add alternates from data providers option is unchecked, the autofill process will provide a pop-up warning (see below) if there are insufficient Part Choice entries available in the BOM – note that Part Choices are present for BOM entries linked to Library components The data providers option is selected in this example. Alternate part lines are added to each BOM entry based on their availability, as can be seen in the Info pane. For this BOM part the Info pane shows only Suggested Alternatives for Primary since the part is not linked to a Library component. The priority for Alternate parts inclusion is Part Choices then Suggested Alternates, as shown in this BOM line. The first Part Choice is the BOM entry’s ‘primary’ part number, so the two requested alternate entries are drawn from the remaining Part Choice and a Suggested Alternate. Any Alternate part entries that already exist, such as manually added alternates, are included in the number of requested additions – they are not overwritten. Similarly, if the Autofill Alternates process is repeated, say with more requested additions, the existing entries will remain as part of the total number of requested additions. |


When choosing to populate Alternate entries with Part Choices only, where the Add alternates from data providers option remains unchecked, the BOM Portal will attempt to add the requested number of entries from the available Part Choices. A warning window is presented if there are insufficient Part Choices available for a particular BOM line part. Note that since one of a component’s Part Choice entries is likely used as the ‘primary’ Manufacturer Part Number (MPN) there is one less available for Alternate part additions.
|
The default Autofill Alternates window condition is to automatically populate BOM Alternate entries from available Part Choices. Leave the Add alternates from data providers option unchecked (disabled) for this approach. If a BOM line part has less than the requested number of Part Choices, then the BOM Portal will add those available and present a detailed warning window. In this example, two of the four BOM line parts have insufficient Part Choices. While two Part Choices are shown here in the Info pane, only one is available as an alternative part because the other Part Choice applies to the BOM line’s ‘primary’ manufacturer part ( This BOM line part can provide the two requested Alternate entries because a total of four Parts Choice entries are available as valid alternatives. |


Autofill Extra Quantity Copy Link Copied
The BOM Portal’s Autofill Extra Quantity feature provides a convenient, automated way to optimize component purchasing numbers based on production considerations such as SMT machine setup wastage, typical assembly attrition, and additional parts stock requirements.
Additional BOM quantities are automatically calculated as a percentage of the required production quantity or as a specific number increase. The extra quantities can be applied to passive devices (resistors, capacitors, etc) by case/package style, or to other specific part categories based on their Component Type. Note that a BOM line’s total quantity figure (Total Qty) equates to the number of BOM parts (Quantity) multiplied by the BOM Production Quantity, plus any additional part quantities (Extra Qty).
|
Choose the Autofill Extra Quantity option from the upper For adding extra passive parts, choose a specific component package type from the Case/Package drop-down menu options ( Multiple extra quantity rules can be added by selecting more package types from the Case/Package menu and specifying a number (pcs) or percentage (%) increase. Select the Add the first one option in the Others section to set up extra parts for other Component Types. For adding extra parts for component types other than those classed as Passive Parts, select a general component type from the Component Types drop-down menu ( Preserve existing values in BOM if they are higher – This option relates to how preexisting extra quantities are handled, such as those added manually or from a previous Autofill process. When enabled, this option will allow only an increase the Extra Qty entry. The extra parts quantities are added to the BOM’s Extra Qty column based on either the passive component package style or a specified Component Type. In this example, Note that a BOM line’s total quantity figure (Total Qty) equates to the number of BOM parts (here, PartCount) multiplied by the BOM Production Quantity, plus any additional part quantities (Extra Qty). The Autofill process increases a BOM part's total quantity by the specified percentage or number of pieces. In the example shown here, the Total Qty figure for line 2 is raised by |


Edit, Move and Clone Copy Link Copied
The BOM Portal allows management of the BOM document itself via the Edit, Move and Clone options available from the from upper ![]() menu.
menu. 
-
Edit – access and edit the Name and Description of the current BOM document. Click
 to accept any changes.

-
Move – relocate the BOM project document to an alternative Workspace parent folder. Choose the target folder (the current folder is dimmed) and then the
 button to confirm. Note that a moved BOM document adheres to the Workspace’s permission inheritance scheme. See Moving a Project for more information.

-
Clone – create a copy of the current BOM document. Accept or edit the cloned document Name, and optionally, add a Description and specify a different parent folder (from the Change option under Advanced settings) – click
 to confirm. When a different target folder is specified, the document will be subject to the Workspace’s permission inheritance scheme.

